MyCourts User Manual
 
Version v 15.21.7.25
×
Menu
Index

The Stock Register

The Stock Register
 
The Stock Register allows you to view all your stock and services as well as add and edit each item.
 
1

Find

Quickly find an item by starting to type the items name here or just select from the dropdown list.
2

View

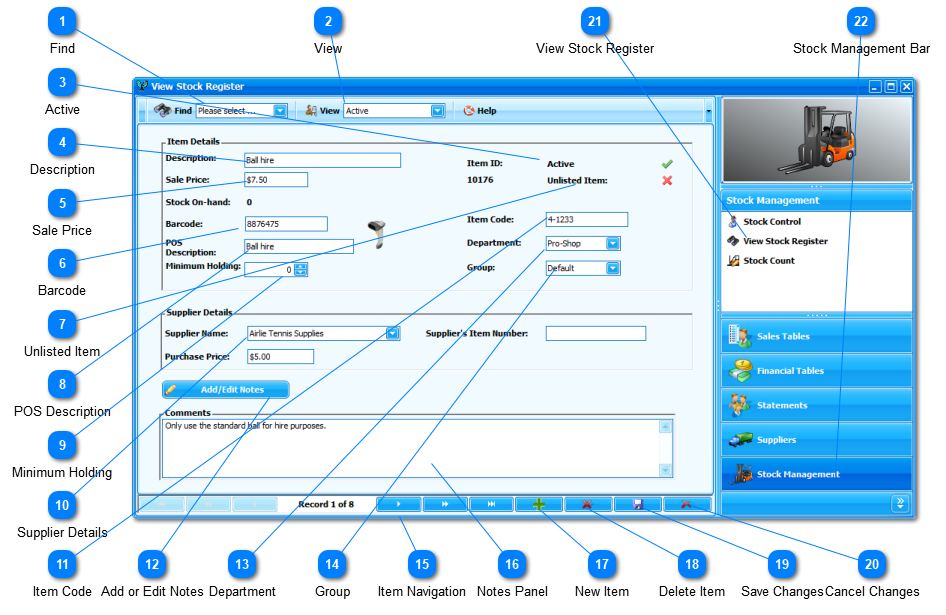
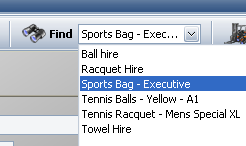
By default only Active items are included in the list however you can chose here to view Active, Inactive or even limit the view to selected Groups.
 
Each box needs to be ticked if it is to be included in the range of items displayed. For example, to view Active items in the Default group, you will need to tick both the Active and the Default boxes.
3

Active

3. Active
Toggling this item Off [] makes this item inactive and hence it will not appear in your list of POS items.
4

Description

4. Description
A description of the item to use in reports, on-screen etc.
5

Sale Price

5. Sale Price
The sale price is the price you sell the item for and it includes GST/VAT.
6

Barcode

6. Barcode
 
Enter the item's barcode here. After you have placed the cursor in this control's box, you can then use your scanner to read in the bar code.
 
Note: You must configure your scanner to use the OPOS drivers that are supplied by the manufacturer. This is normally achieved by scanning codes printed in your bar code scanners manual.
7

Unlisted Item

7. Unlisted Item
Declaring a stock item a Unlisted Item activates this feature. Follow the link for full details.
8

POS Description

8. POS Description
Enter a brief description of the item to display in the Line Display and Receipt Printer.
9

Minimum Holding

9. Minimum Holding
Enter the minimum number of these items to be held in stock before reordering is required.
10

Supplier Details

10. Supplier Details
Select the primary supplier for this item from the dropdown list as well as the suppliers item number and the purchase price. Your Suppliers details are entered in the Suppliers Window.
11

Item Code

11. Item Code
You may record your own Item Code for each item. This information will be recorded on transaction records enabling you to easily export data to your own Accounting package.
12

Add or Edit Notes

 
Add or edit any notes that may apply to the item by clicking this button..
13

Department

13. Department
For internal reporting purposes, select the Department from the dropdown list.
14

Group

14. Group
Use the dropdown selector to chose which Group this item belongs to.
15

Item Navigation

15. Item Navigation
You can scroll through all the items by using the Navigation Bar.
16

Notes Panel

Any notes for this item appear here. You can edit these by clicking the Add or Edit Notes Button.
17

New Item

17. New Item
Click to clear all the fields so you may add a new item.
18

Delete Item

18. Delete Item
Click here to mark the item as 'Inactive'. For accounting and record keeping purposes, items are never actually deleted from the database.
19

Save Changes

19. Save Changes
Click here to save any changes you have made to the item.
20

Cancel Changes

20. Cancel Changes
Click here to delete any changes made to the displayed item.
21

View Stock Register

21. View Stock Register
Selecting this navigation bar opens this window.
22

Stock Management Bar

22. Stock Management Bar
Click here to open the Stock Management options.